
Instructions
General Aalto IT instructions are primarily hosted at https://www.aalto.fi/fi/it-help. The instructions hosted here are specific to the Linux computers and environment.
Home and work mounts
Aalto ITS provides two main directories for files: Home and Work. They are backed-up network shares that users can store their data on. Please see Aalto Data Storage Best Practices document for more detailed information on the work shares.
File permissions on home and work mounts
Home directories implement regular Unix-style
permissions. Work mounts use Windows-like
ACLs (Access Control Lists), which implement a more granular permission
model. It is possible to view, set and modify the ACLs from Linux using
the tools provided in package nfs4-acl-tools, but if there is need to
modify the permissions, the preferred way is to use for example a
VDI
Windows computer.
Home and work: desktops and shell servers
On desktops and shell servers the home directories are mounted using NFS (network file system). This means that the same home directory is available on all Linux desktops. Home directories have a quota, which is currently 100GB.
Work directories are automounted using NFS and can be accessed under the
/work tree.
For staff there may also be some department-specific Teamwork shares. Those are usually mounted on department workstations under /teamwork but most Teamwork mounts are not directly available on shell servers or classroom computers.
Note that on desktops and shell servers accessing the NFS mounts requires a valid Kerberos ticket. Read Kerberos tickets for more information on Kerberos.
Home and work: laptops
On laptops, the home directory is local and is not synchronised or backed up on network drives. The files can be synchronised with kosh.aalto.fi using unison or rsync, for example.
Work directories are not mounted by default.
On Aalto premises, it is possible to access work directories using the
SMB (Server Message Block) protocol. This can be done using nautilus
or thunar, typing in the URI smb://work/ and browsing the tree
from there. For command line use, smbclient provided by Samba is one
of the better tools.
SSHFS can also be used to access the network drives remotely. It is a FUSE (Filesystem in USErspace) filesystem that accesses files through an SSH (secure shell) connection to a server. It has a few caveats, but in general works reasonably well over good connections.
You can use sshfs to mount work directories:
$ mkdir -p ~/work
$ sshfs <username>@kosh.aalto.fi:/work ~/work
Password:
$
Unmounting a FUSE filesystem (assuming the mountpoint is ~/work):
$ fusermount -u ~/work
NOTE: Do not use FUSE filesystems on mountpoints under Kerberos-mounted NFS filesystems (i.e. home directories on desktops). Filesystems mounted on such mountpoints cannot be unmounted and will require a reboot to fix.
Backups/snapshots and restoring files
All the Aalto network filesystems are backed up regularly. The backups
can be accessed via special directories named .snapshot.
For instructions on accessing and restoring files using the snapshots, please see https://www.aalto.fi/en/services/restoring-a-file-windows-mac-linux
Data on laptops is not backed up automatically so please remember to store (and regularly back up) any important local files to Aalto network drives as well.
OneDrive usage
Aalto OneDrive (or any other OneDrive) can be used utilized to synchronize files between your computer and OneDrive using the following instructions:
Aalto Ubuntu 22.04
1. Install OneDrive on your computer (if not installed):
$ pkcon install onedrive
2. Open OneDrive for the first time:
$ onedrive
3. OneDrive will prompt you the following:
Authorize this app visiting:

https://login.microsoftonline.com/common/oauth2/v2.0/authorize?client_id=0000000-0000-0000-0000-0000000000&scope=Files.ReadWrite%20Files.ReadWrite.all%20Sites.ReadWrite.All%20offline_access&response_type=code&redirect_uri=https://login.microsoftonline.com/common/oauth2/nativeclient

Enter the response uri:
Copy the URI, paste it into your browser and login with your Aalto-email. Use MFA if required.
4. Once you have logged in successfully you will be prompted a blank white page. Copy the URI from the address-bar and insert it to the onedrive for linux "Enter the response uri:"-section.
5. If the authorization was successful, you will be prompted:
Application has been successfully authorised, however no additional command switches were provided.

Please use --help for further assistance in regards to running this application."
6. Use the following command to get started:
$ onedrive --help
For simple remote-local folder synchronization run command "onedrive --monitor". This will synchronize remote and local changes until you terminate the program.
If you want to deauthorize onedrive on a certain device you can remove the following file:
$ rm -f ~/.config/onedrive/refresh_token
Doing this on your Aalto-desktop or Aalto-shell server will deauthorize onedrive on all Aalto-devices with NFS-mounted homes directories.
If you want to remove local onedrive database information AND deauthorize onedrive remove the following directory:
$ rm -rf ~/.config/onedrive
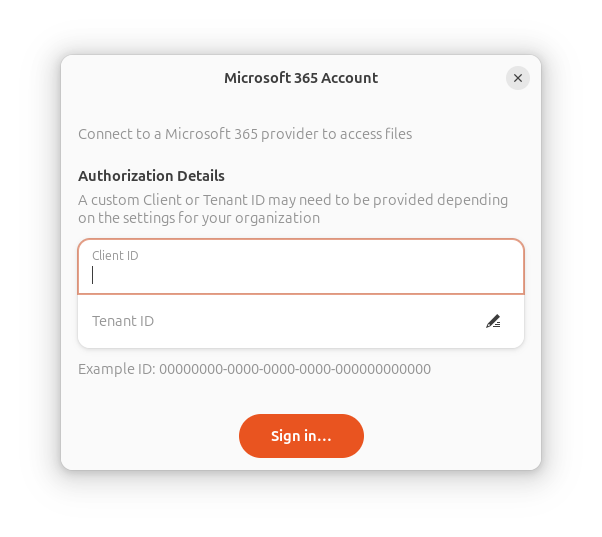
Aalto Ubuntu 24.04
1. First visit https://office365.com with a browser, log in and navigate to OneDrive.
2. Open Gnome Settings, select Online Accounts

3. Select Microsoft 365 and choose Sign in in the first popup and leave the Client ID and Tenant ID fields empty
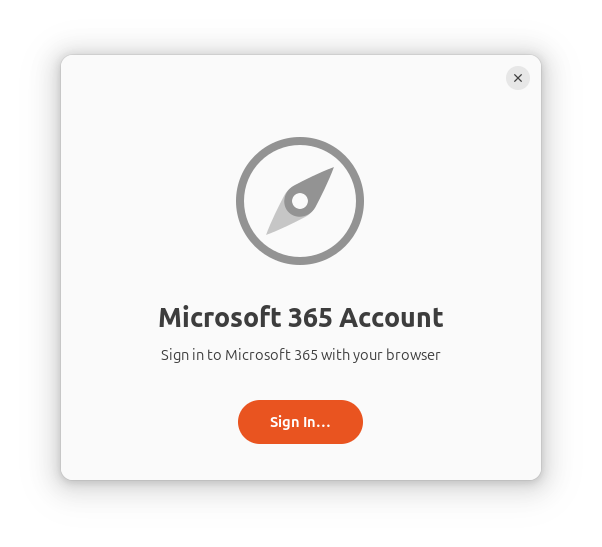
4. Click Sign in in the popup that follows ("Sign in to Microsoft 365 with a browser").
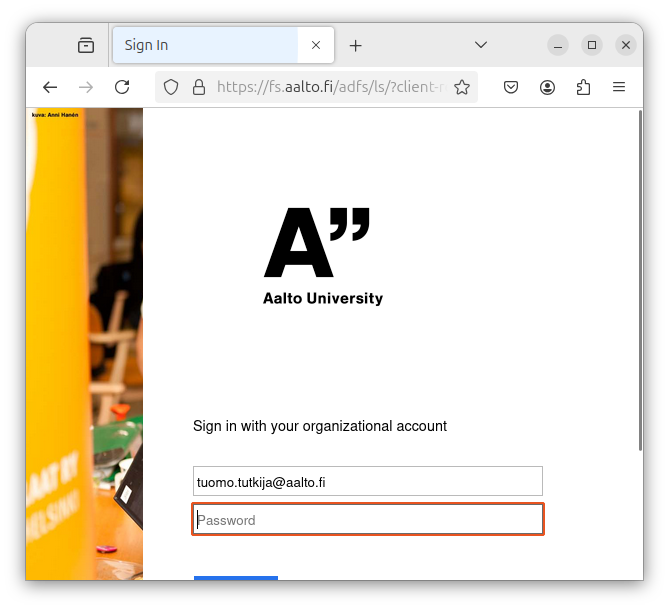
5. Type your Aalto e-mail address and press Next
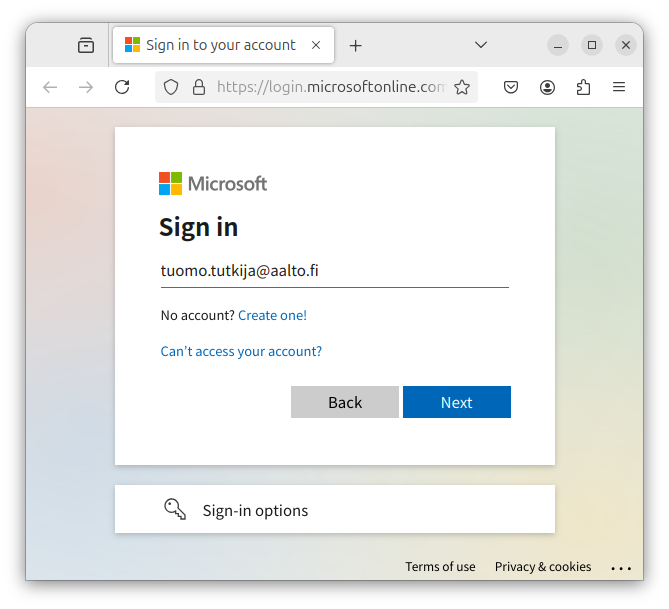
6. You will land to Aalto sign in page (fs.aalto.fi). Log
in using your password.
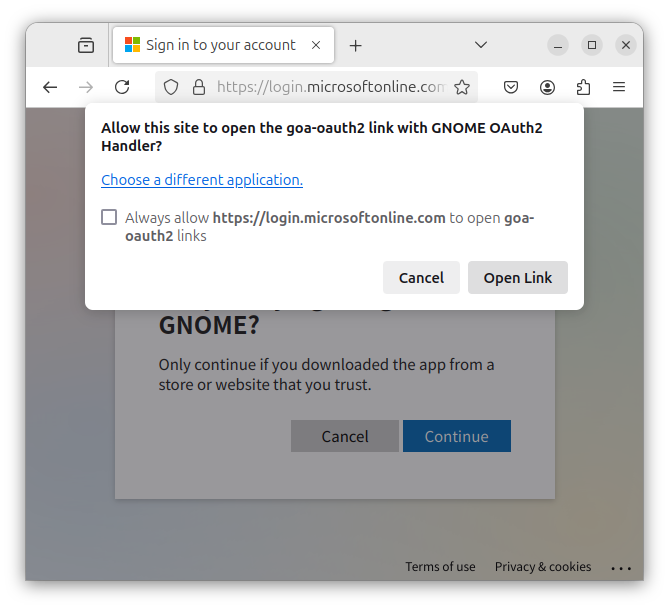
7. Click Continue in the prompt that asks if you are trying to sign in to GNOME.
8. Choose Open Link from the browser popup that asks if you want to open
the goa-oauth2 link with GNOME OAuth2 Handler.
9. Make sure that Files is selected in the Gnome Settings popup that
follows and close the popup.
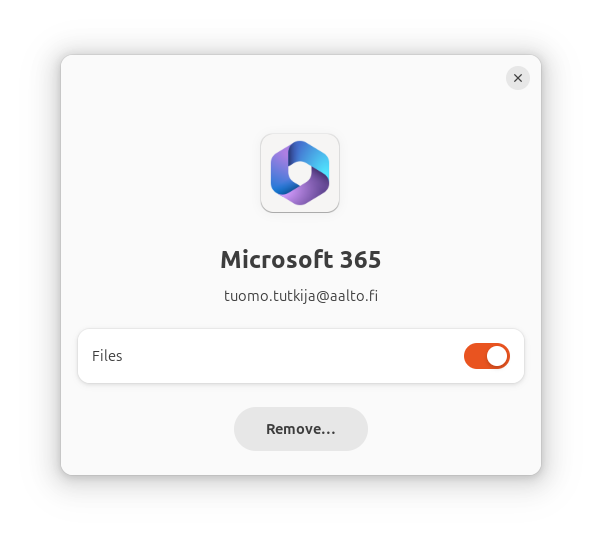
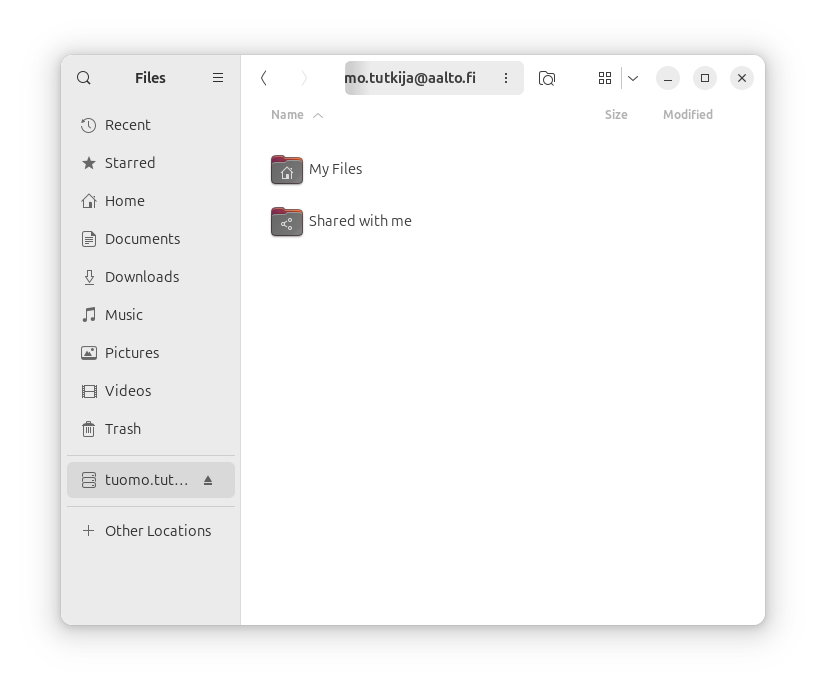
10. You should now see your OneDrive in Nautilus.
Changing passwords
To change your password on an Aalto Linux computer, use the command passwd and follow the instructions.
tteekkari@kosh:~$ passwd

         Aalto password requirements:

* The password must be at least 12 characters long
* The new password must differ from your last 24 passwords
* You can change your password again only after 24 hours
* The password must include at least

    one upper case character
    one lower case character
    one numeric or special character

* Only use characters in the ASCII set (i.e. NO €,ä,ö,etc.)

* Example passwords:

        er8aexi5Chi5    ahn5eef0uXah    Auqu4kau6axo

        xoic4Miequie    iej2jo4Iezai    eBaij0atauvo

Current Password for tteekkari@ORG.AALTO.FI: <*type your old password here*>
Enter new password: <*type the new password here*>
Enter it again: <*type the new password again*>
Password changed.
tteekkari@kosh:~$
For other ways to change your Aalto password, please see https://www.aalto.fi/en/services/changing-a-password.
Keyring
GNOME keyring is a key management and retention facility. It stores and groups keys, passwords and certificates and makes them available for applications.
If you change your aalto account password through e.g. https://password.aalto.fi, the keyring on your Aalto workstation will not updated automatically. The keyring does not know your new password and will ask you to input your old Aalto password to unlock keyring. The prompt can also be seen when opening applications which use the Login keyring, e.g. chrome.
If you remember your old password, try:
- Run
seahorseon the commandline - Click the unlock button

- Input your old Aalto password to the dialogue
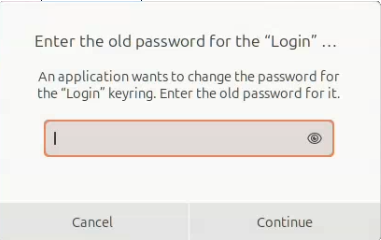
- The keyring password should update automatically after you unlocked it to reflect the new login password
- Logout and login to ensure the change works
If you do not remember your old password or this did not help, try deleting the Login keyring and logout and login to ensure the change works. This should automatically generate a new version of the Login keyring, which uses your new aalto password.
Kerberos tickets
Kerberos is an authentication protocol and scheme developed at MIT. It is based on tickets. In Aalto, accessing home and work directories requires a valid Kerberos ticket.
There are basically two types of tickets, the TGT (ticket-granting ticket) and service tickets. The difference is that the TGT is obtained by logging in with a password and is used for getting service tickets. Service tickets are granted against a valid TGT. At Aalto, a user gets a new TGT on a computer every time he/she logs on using a password. All sessions on a single computer should share the same ticket cache, so all the sessions will be refreshed at the same time. Unlocking the screensaver will also re-fetch the TGT. Service tickets are obtained automatically if the user has a valid TGT.
The TGT has an expiration time and a maximum lifetime. If a ticket is not renewed, it expires after the expiration time. The maximum lifetime is the time until which the ticket can be refreshed without another login/unlock. The maximum lifetime is set to 7 days and in the Aalto environment, tickets that are about to expire are usually renewed automatically until that time.
As a valid Kerberos service ticket is needed for accessing network mounts on workstations, it may be necessary to manually get a new ticket if one cannot access the home directory. This can be done with the command kinit.
Your ticket cache can be displayed with the command klist and emptied using kdestroy
Example:
tteekkari@kosh:~$ klist
Ticket cache: FILE:/tmp/kerberos/krb5cc_1955262
Default principal: tteekkari@ORG.AALTO.FI

Valid starting       Expires              Service principal
2019-12-02 13:07:04  2019-12-02 23:07:04  krbtgt/ORG.AALTO.FI@ORG.AALTO.FI
        renew until 2019-12-09 13:07:04
tteekkari@kosh:~$ kdestroy
tteekkari@kosh:~$ klist
klist: No credentials cache found (filename: /tmp/kerberos/krb5cc_1955262)
tteekkari@kosh:~$ kinit
Password for tteekkari@ORG.AALTO.FI:
tteekkari@kosh:~$ klist
Ticket cache: FILE:/tmp/kerberos/krb5cc_1955262
Default principal: tteekkari@ORG.AALTO.FI

Valid starting       Expires              Service principal
2019-12-02 13:09:06  2019-12-02 23:09:06  krbtgt/ORG.AALTO.FI@ORG.AALTO.FI
        renew until 2019-12-09 13:09:02
tteekkari@kosh:~$
If everything is working correctly, you should have a valid TGT on a desktop computer for 7 days from each time you login or unlock the session using a password. Note though that a reboot will clear any ticket caches.
Software
Aalto-provided software, installing/removing
Aalto ITS provides several commercial software that can be used on the Linux workstations. These include:
- Comsol
- MatLAB
- Mathematica
- Maple
They are available as Debian packages from the Aalto repository.
Installing software on workstations
Most regular apt commands will not work for regular users as they require root access for many operations.
On Aalto workstations, there is a primary user set for each workstation. The primary user can install Debian packages from a list of repositories on the workstation using pkcon instead of apt. This prompts for user credentials but works without root access.
Installing packages (equivalent to apt-get install):
$ pkcon install <package>
Removing packages (equivalent to apt-get remove):
$ pkcon remove <package>
Refreshing the package lists (equivalent to apt-get update):
$ pkcon refresh
Updating the packages on the computer (equivalent to apt-get upgrade):
$ pkcon update
The usual apt and Debian tools work for searching the package lists, etc.
Searching for a package:
$ apt-cache search <string>
Checking the available/installed package versions and where the package can be or was installed from:
$ apt-cache policy <package>
In general, if you need software that is not found in the package repositories, we can package it and add it to the repositories. However, this is usually only done if the software is needed by at least a few people. Please contact servicedesk@aalto.fi if you need something that is not packaged already.
For alternatives, see other ways to install software.
Module system
Environment Modules is a tool that modifies a user's shell environment dynamically, usually to introduce some feature or software into it. The implementation in use at Aalto is lmod.
Note that modules are not available on laptops.
The modules are accessed using the command module.
Listing available modules:
$ module avail
Loading a module:
$ module load <module>
Unloading a module:
$ module unload <module>
Unloading all modules:
$ module purge
Note that the module command only modifies the current shell's environment so running module commands in one shell will not affect your other shell sessions. If you want to have a module loaded in all sessions you can add the module load command to your shell's startup scripts. Note, however, that the module system might not be available on each and every computer you log in to (the shell servers kosh and lyta are a notable exception), so doing or not doing this is left to your own discretion.
Most of the modules are provided by Science-IT. Many of the modules are available for everyone although some may be limited to a single department because of licensing. A few of the commonly used modules are the different Anaconda environments and older software versions of MatLAB, Mathematica etc.
Please also check the Science-IT documentation on the module system.
Other ways to install software and packages
Compiling into the home directory
Please note that software 'installed' this way may fail to work when the distribution version changes. This is thus only good for trying out stuff or compiling programs that you would have had to compile anyway. This is done at your own risk and any OS updates will not be deferred, even if they affect software installed in this manner.
Open-source software is often provided with an autoconf-generated configure-script. The general instructions for compiling such software usually tell you to:
$ ./configure
$ sudo make install
This is usually a bad idea. With a little bit of tweaking, the software can be installed into one's home directory:
$ ./configure "--prefix=${HOME}"
$ make install
This way no root access is required. In addition any system files the
install script might otherwise overwrite will stay intact. It may still
be necessary to add the lib and bin directories to LD_LIBRARY_PATH
and PATH respectively (the example is for bash, adjust accordingly for
other shells):
$ export LD_LIBRARY_PATH=${HOME}/lib:${LD_LIBRARY_PATH}
$ export PATH=${HOME}/bin:${PATH}
Also in case the software installs man pages, you may need to
$ export MANPATH=${MANPATH}/man:${MANPATH}
These can be added to the shell's rc or login scripts so they do not need to be typed again in each session.
It is usually possible to do this also if the software uses cmake or some other build system. Please see the documentation for the software and the build system for these cases.
Programs compiled by the user may break when the distribution version on the computers changes and any shared libraries are updated.
Python, pip and virtual environments
Python is an interpreted general-purpose programming language with a large ecosystem and a nice feature set for academic work, including built-in support for arbitrary-precision arithmetic. It has its own package manager, pip or pip3 ('pip installs packages'). The package manager manages the libraries and dependencies and installs the necessary packages. Pip can be installed on a computer via pkcon install python3-pip.
The problem with pip is that, by default, it tries to overwrite system-wide files, which are provided by the distribution. It should never be used as-is on a managed computer.
There used to be a possibility to install python packages into the user's home
directory (~/.local/lib/python*/) by using the option --user, but since
Ubuntu 24.04 the Python base environment has been marked externally managed
and it is no longer supported (for more information on this, see
PEP668).
There are a couple tools that implement virtual environments in Python. They are (mostly) self-contained environments that can have different versions and flavours of packages isolated from the system ones. The tool usually shipped with newer Python installs is called venv and it is used in many online instructions. Here as an example, we will use virtualenv, which is an older, more mature tool with more features. Virtualenv can be installed via pkcon install virtualenv.
Virtual environments should in general be used anytime Python modules that are not available as Debian packages are needed for a project.
Using virtualenv
A new virtual environment can be created using the command virtualenv. This creates a directory for the environment that contains the python interpreter, pip and some scripts. The environment can then be activated using the activate script. As the script modifies environment variables, it needs to be sourced instead of being run normally. Pip can then be used to install the necessary packages and programs into the environment. As long as the environment is activated, the python modules installed in the environment can be used. The environment can be deactivated by typing deactivate.
$ virtualenv my_project_environment
$ source my_project_environment/bin/activate
(my_project_environment) $ pip3 install <package>
(my_project_environment) $
When the environment is activated, the Python modules installed in the environment can be used. The environment can be deactivated by typing deactivate.
(my project_environment) $ deactivate
$
Please note that virtual environments cannot be nested.
LaTeX
LaTeX is a document preparation system popular in academia. On Ubuntu,
it is provided in TeXLive distribution packages. As the package
collection included in the distribution is pretty extensive, please make
sure the package you want is not included in it before resorting to
anything presented here. Also make sure at least the Ubuntu packages
texlive-full and texlive-latex-extra are installed.
When compiling a document, LaTeX (and PdfLaTeX etc) looks for macros in the following order:
- Current directory (
.) - The
texmfdirectory under the user's home directory (~/texmf) - System-wide directories
Thus if you need a package that is not found in the system-wide
directories, it can be installed either in the document directory or, if
it is likely to be used in more than one document, in the ~/texmf
directory. It is also possible to override the system package with a
different version of the package using one of these two methods.
If the package is provided as a .sty file, it can be included directly
in the document directory or the ~/texmf directory. The texmf
directory has a special structure, which is described in depth in
https://tug.org/tds/tds.html (unfortunately, not a very good read).
For a LaTeX package, installing a .sty file in ~/texmf would look
something like this:
$ kpsewhich zref.sty
/usr/share/texlive/texmf-dist/tex/latex/oberdiek/zref.sty
$ mkdir -p ~/texmf/tex/latex
$ cd ~/texmf/tex/latex
$ mkdir zref
$ cp <path_to_newer>/zref.sty zref/
$ texhash
$ kpsewhich zref.sty
/<path_to_home_directory>/texmf/tex/latex/zref/zref.sty
Running the command kpsewhich <package>.sty in the document directory will show where the LaTeX interpreter would load the file from.
If the package is provided in source form as .ins and .dtx files,
please see https://texfaq.org/FAQ-dtx (unfortunately, not a
very good read either) for instructions on how to obtain the .sty file
ready for use with LaTeX.
Printing
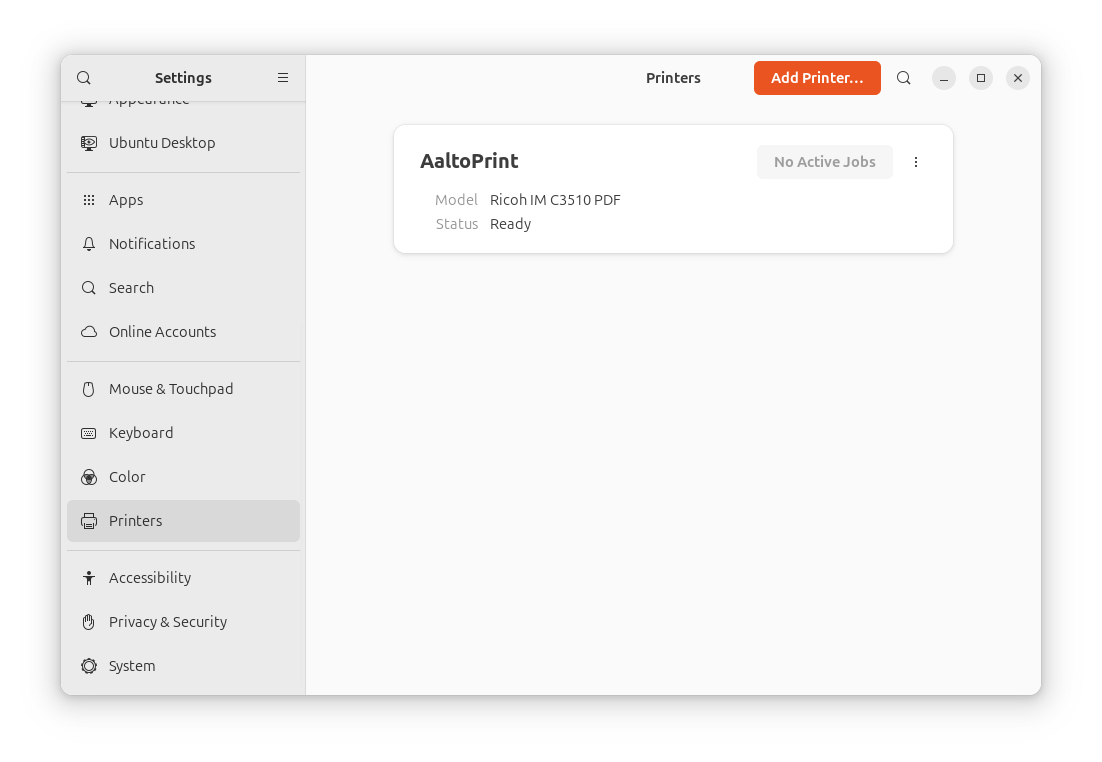
AaltoPrint
Aalto workstations have a preconfigured print queue, AaltoPrint. This print queue is common for all AaltoPrint printers; print jobs sent to this queue can be picked up at any AaltoPrint printer using an Aalto ID card. This queue uses Kerberos tickets for authentication.
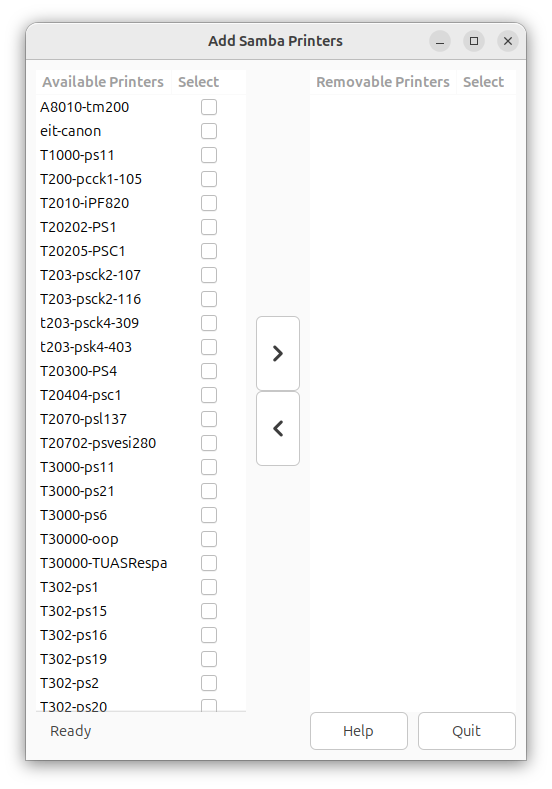
Other Aalto printers
In addition to the default print queue, primary user can add specific printers with the tool "Add Samba Printers" (add-samba-printers). The tool lists the printers available on the print server and can add them to the local computer. Unlike AaltoPrint, these queues print directly (ie. the specified printer will print the job immediately) and do not require a personal printing card.
Typical printing issues
If a job is printed without a valid Kerberos ticket, it will end up in the workstation local printing queue indefinitely. A notification is shown if this happens:
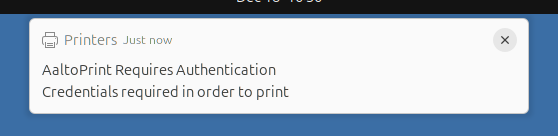
If this happens, the job can be cleared using lprm. You can check the job number using lpq -PAaltoPrint:
$ lpq -PAaltoPrint
AaltoPrint is ready
Rank    Owner   Job     File(s)                         Total Size
1st     tteekka 1       example.pdf                   12288 bytes
2nd     tteekka 2       example.pdf                   12288 bytes
The job can then be deleted using its Job number from the listing:
$ lprm 1
$ lpq -PAaltoPrint
AaltoPrint is ready
Rank    Owner   Job     File(s)                         Total Size
1st     tteekka 2       example.pdf                   12288 bytes
This will need to be done for all stuck jobs. A notification is also shown when a job is deleted:
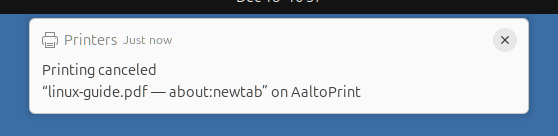
Before printing the job again, a Kerberos ticket is needed, please see Kerberos tickets.
public_html
public_html: desktops and shell servers
On desktops and shell servers there is a public_html symlink in the user's home directory. Files in that directory are served at https://users.aalto.fi/~username/. For more information on users.aalto.fi, see https://www.aalto.fi/en/services/usersaaltofi
If the symlink is missing, it can be recreated. It should point to
/m/webhome/webhome/<nn>/username/public_html, where username is
your username and the number <nn> is the number found in your
home directory path. You can check the path to your home directory using
echo ${HOME}.
The symlink can then be created with the command:
ln -s /m/webhome/webhome/nn/username/public_html ~/public_html
Note that any files in public_html have to be world-readable for them to be accessible through users.aalto.fi.
public_html: laptops
On Aalto premises, the public_html directory can be accessed using the SMB
protocol (nautilus, smbclient, etc; see home and work mounts).
The share is smb://webhome/<username>.
Using workstations and their software remotely
The preferred way of accessing Aalto software remotely is the VDI environment. The VDI computers (and also the shell servers) have much of the same software as the public classroom computers. In some cases though, you may need to also access physical computers remotely. This can be done using a combination of VDI and SSH or, in some cases, just SSH.
Shell servers
The shell servers have mostly the same software as the classroom computers apart from computation-intensive scientific software. If you want to access classroom computers from outside Aalto network, you will need to log on to them via the shell servers. Please see https://www.aalto.fi/en/services/linux-shell-servers-at-aalto for a list of the servers and their public SSH key fingerprints.
To access the shell servers from outside Aalto, you will need to configure
your SSH client to use an SSH private key. For OpenSSH, this is done by either
configuring the client to use the key for the shell servers via Host
statements or using the default filename in which case the client will offer
the key automatically.
The default filenames for the keys are (for each key type):
~/.ssh/id_rsa
~/.ssh/id_ecdsa
~/.ssh/id_ed25519
A sample Host statement in ~/.ssh/config could look something like this:
Host kosh.aalto.fi lyta.aalto.fi brute.aalto.fi force.aalto.fi viila.org.aalto.fi
  User <your aalto username>
  IdentityFile ~/.ssh/<private key filename>
  IdentitiesOnly yes
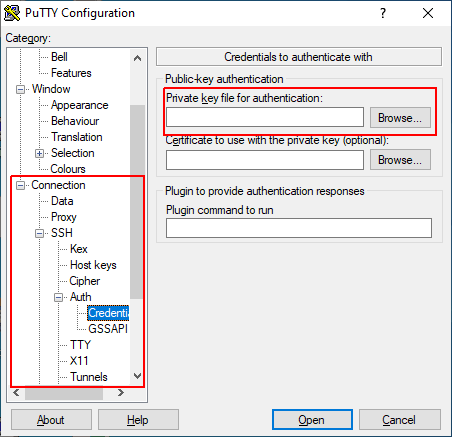
For PuTTY, the private key the client will try is configured under Connection -> SSH -> Auth -> Credentials:
In addition to the client, you need to set up an authorized_keys file in
your Aalto home directory. Brief instructions for that can be found at
https://www.aalto.fi/en/services/creating-ssh-keys-for-public-linux-servers-in-aalto.
Classroom computers
The physical public classroom computers can be accessed via SSH from the shell servers kosh.aalto.fi and lyta.aalto.fi. Please see https://www.aalto.fi/en/services/it-classrooms for a list of the classroom computers. Please be considerate of other people using the computers -- especially local users -- as the computers are primarily meant for classroom use. Remote processes have a higher nice value and it is not allowed to load the computers so heavily that the local users' experience is affected.
Staff computers
In some cases there is special software installed on a personal staff workstation which needs to be used directly from the workstation. It is, at least to some extent, also possible to use a staff workstation remotely. For this, SSH access is needed. For many departments, this has been allowed from the staff-only viila.org.aalto.fi shell server. If this is not the case for you and you need this, please contact servicedesk@aalto.fi.
Remote use
Non-graphical programs can be run normally using SSH. For graphical software, a bit more tweaking is needed. The preferred way of using graphical software remotely is X forwarding through an SSH connection. How this is done depends on your client OS.
The general, preferred and client-agnostic way is to use the VDI environment and display the programs run on the personal workstation there. Using the VDI you can also leave the session running for some time independent of your client computer. As the VDI protocol is also optimised for slower/laggy connections, it should work much better than using a home computer as the X server.
If you really, really want to use your own computer, you will need to run an X server on your computer and use SSH via a jump host to run the programs. You will also need to have a good network connection and the connection and the client computer need to be up all the time while using the remote program.
Note that some departments may have their own jump hosts/shell servers that can (and probably should) be used for this purpose. For these, please consult your department IT admins.
Using VDI
Connect to the VDI environment and then follow the instructions for the VDI computer OS of your choice:
Using your own computer
Own Mac computer
If you are using a Mac, you can use for example
XQuartz. When using XQuartz, you need to use
the option -o XAuthLocation=/opt/X11/bin/xauth with the ssh -X or
add it to your ~/.ssh/config:
Host *.org.aalto.fi
  XAuthLocation /opt/X11/bin/xauth
You should have XQuartz running and connect to your workstation via viila.org.aalto.fi, for example:
$ ssh -o XAuthLocation=/opt/X11/bin/xauth -X <username>@viila.org.aalto.fi
viila $ ssh -X <username>@<workstation>.org.aalto.fi
workstation $ xclock
If you are not staff and connecting to the classroom computers, substitute kosh.aalto.fi for the server name wherever viila is mentioned.
Own Windows computer (also VDI Windows 10)
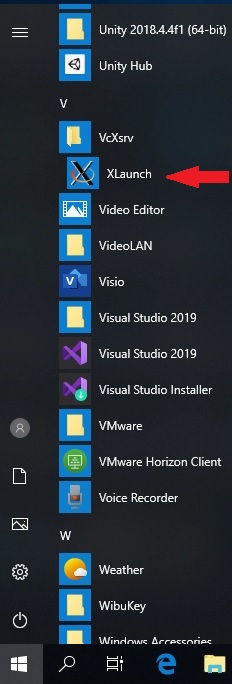
If you are using Windows, there are multiple choices of X server. At least Xming, VcXsrv or X410 should work. In addition to an X server, you need an SSH client capable of performing X11 forwarding. For this, PuTTY should work fine. Both VcXsrv and PuTTY are also installed on the Aalto VDI Windows computers.
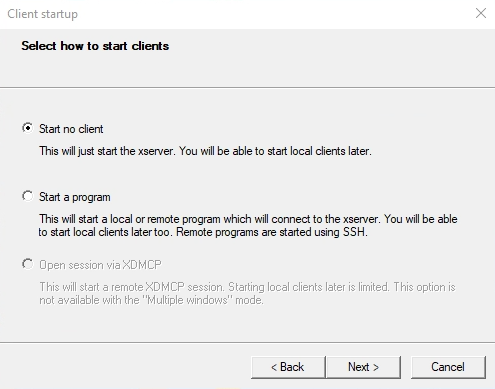
If you are using VcXsrv and PuTTY, start VcXsrv:
You will need to choose your settings, for example:
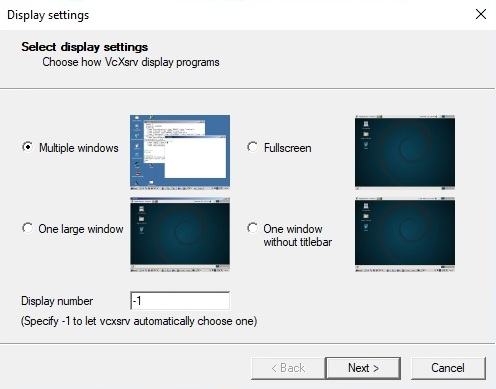
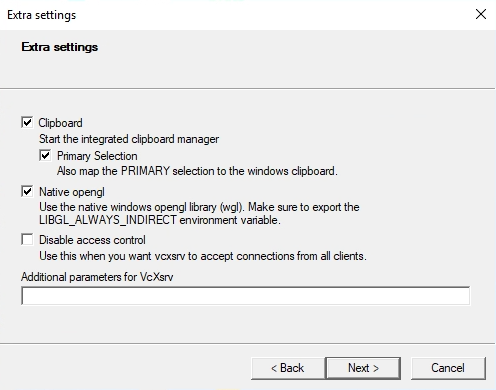
Do NOT disable access control here. Please see security implications for more on this.
With VcXsrv running, start PuTTY and enable X11 forwarding for your session:
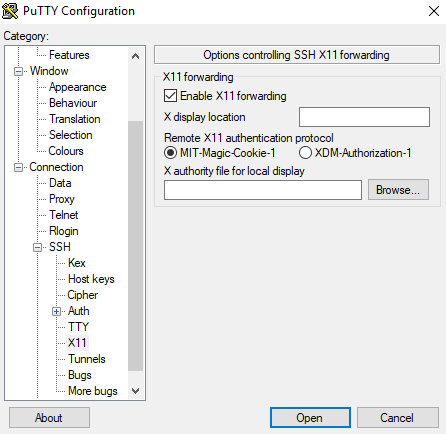
Connect to viila.org.aalto.fi as you would normally and then connect to your workstation. Now you can run X programs remotely.
viila $ ssh -X <username>@<workstation>.org.aalto.fi
workstation $ xclock
If you are connecting to the classroom computers and are not staff, substitute kosh.aalto.fi for the server name wherever viila is mentioned.
Own Linux computer (also VDI Ubuntu)
If you are using Linux, chances are that if you are using a graphical
environment, you are alredy running an X server and you should be fine
just using ssh -X.
$ ssh -X <username>@viila.org.aalto.fi
viila $ ssh -X <username>@<workstation>.org.aalto.fi
workstation $ xclock
If you are connecting to the classroom computers and are not staff, substitute kosh.aalto.fi for the server name wherever viila is mentioned.
Security implications
From man ssh_config:
     ForwardX11
             Specifies whether X11 connections will be automatically redi‐
             rected over the secure channel and DISPLAY set.  The argument
             must be “yes” or “no”.  The default is “no”.

             X11 forwarding should be enabled with caution.  Users with the
             ability to bypass file permissions on the remote host (for the
             user's X11 authorization database) can access the local X11 dis‐
             play through the forwarded connection.  An attacker may then be
             able to perform activities such as keystroke monitoring if the
             ForwardX11Trusted option is also enabled.
If you are using your own computer and/or a Windows X server, please make sure you do not disable the security features/access control of the X server you are using. Also, do not use the client -X option or ForwardX11 config option (these are the same thing) for connections unless needed to minimise any risk.
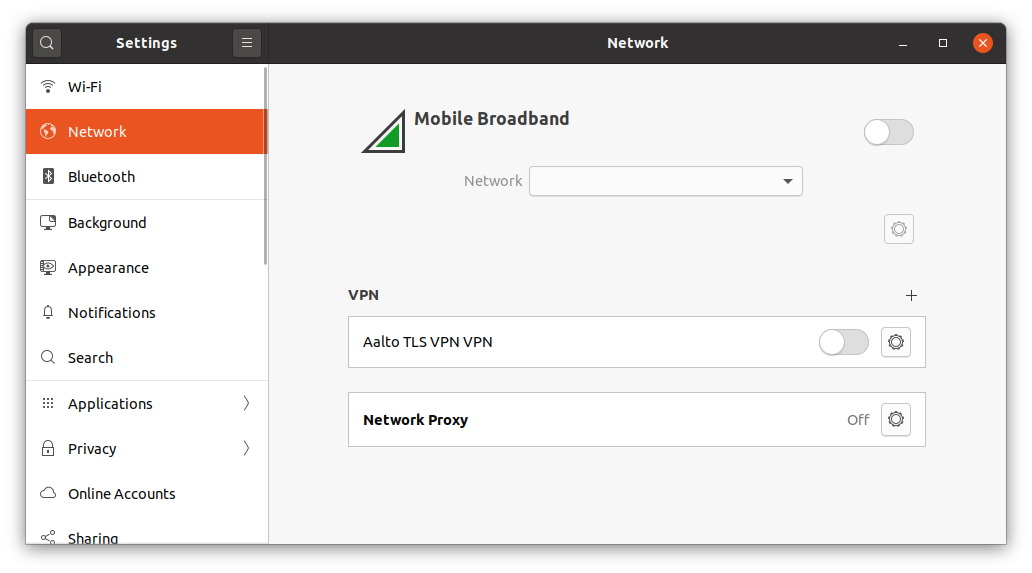
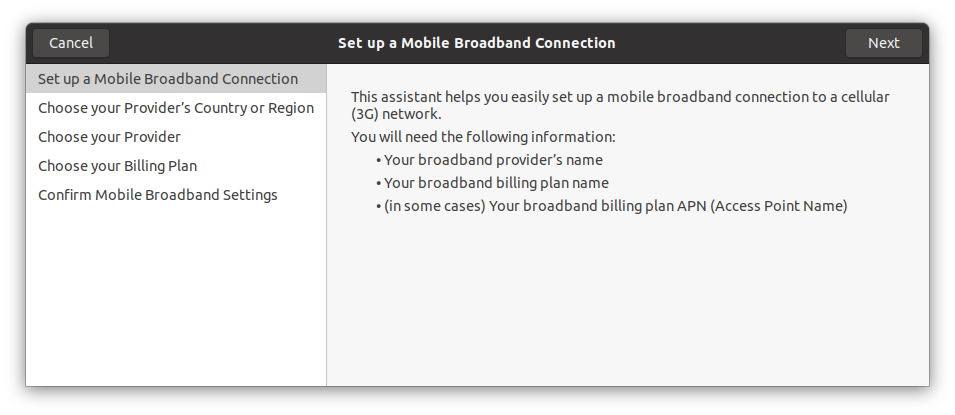
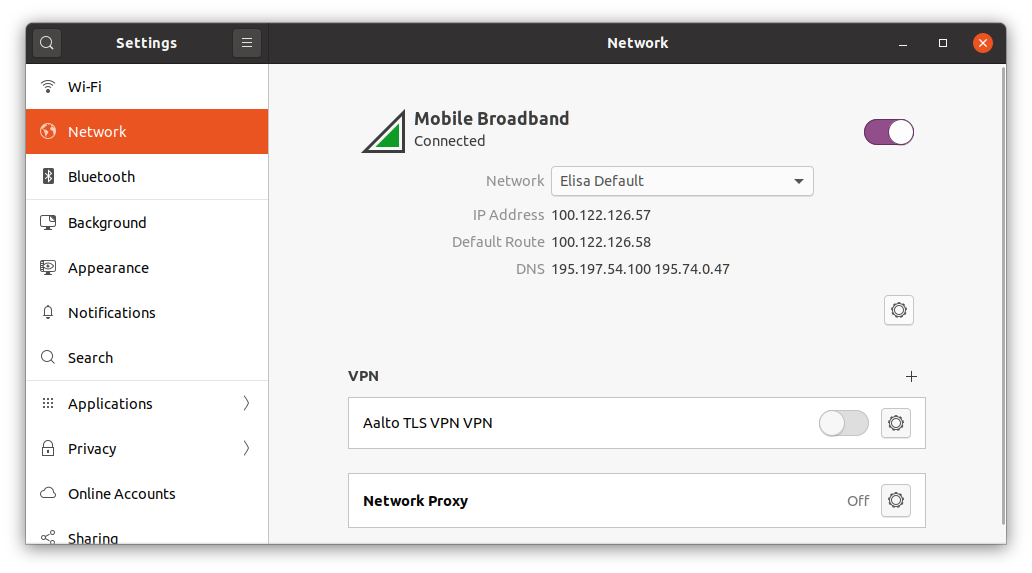
Mobile Broadband connection
To establish the mobile connection for the first time with an Aalto-laptop that has an integrated mobile broadband module you should:
-
Insert the SIM-card to your device.
-
Open ''Settings'' and go to section ''Network''
-
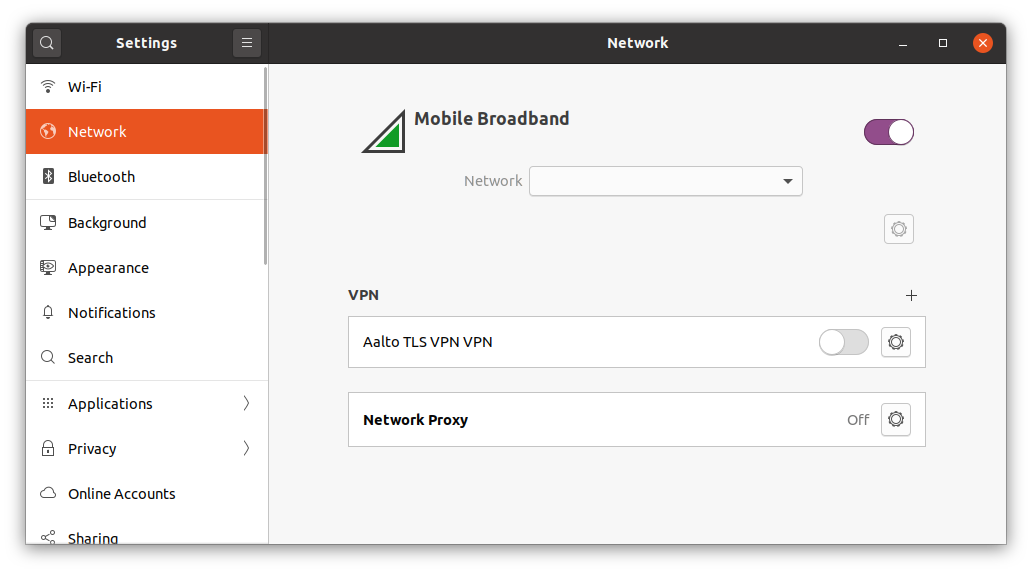
Enable Mobile Broadband by clicking the slider button on the top-right corner
-
Click the dropdown-menu and choose ''Add new connection''
-
Click next (on the top-right corner)
-
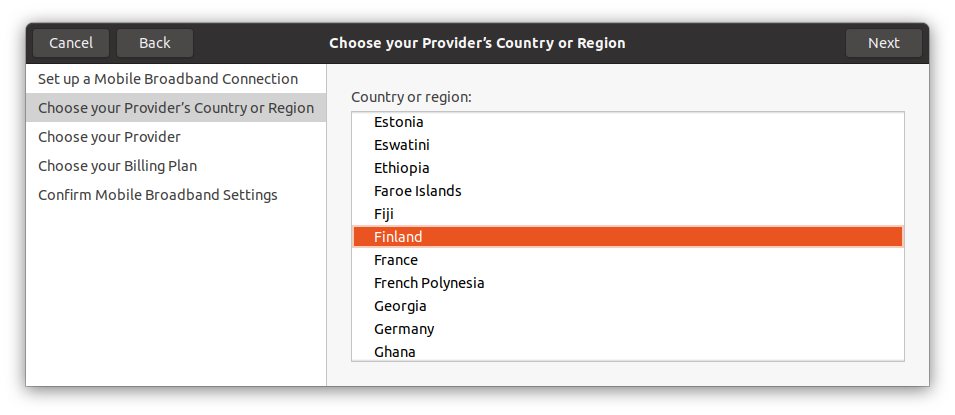
Choose your provider's country or region and click next.
-
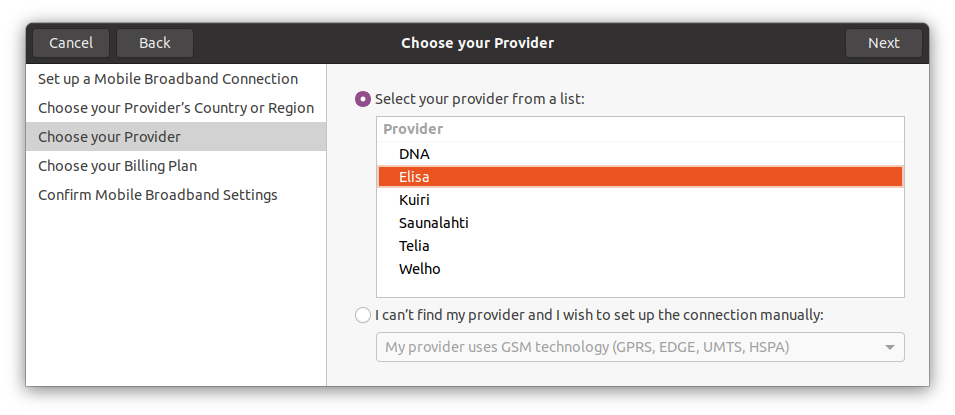
Choose your provider from the list and click next.
-
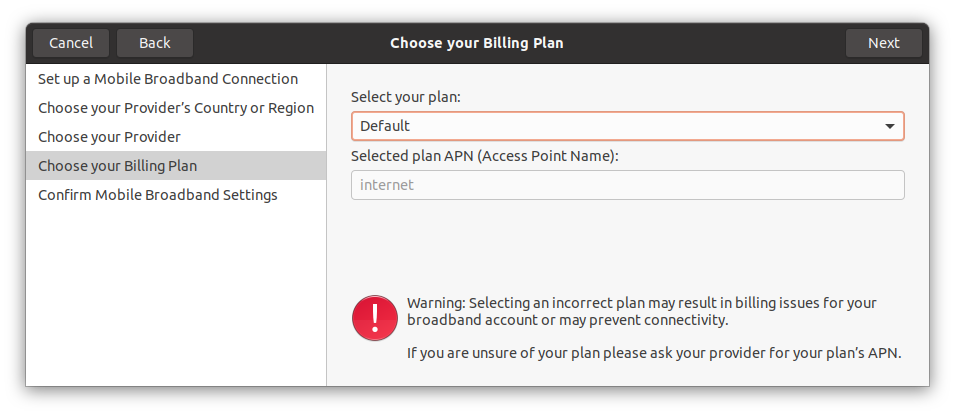
Select your billing plan and click next. Most of the time ''Default'' will do if the APN is autofilled (APN is ''internet'' with most of the Finnish operators).
-
Enter the PIN-code for the SIM-card when prompted.
-
If the ''Settings''-window shows you IP address, Default Route and DNS address(es), the mobile connection should now be established.
Scientific computing
Please see https://scicomp.aalto.fi/ for information on scientific computing in the Aalto environment.
Common problems
Please also check out FAQ.
Chrome or Firefox does not start
If you see an error related to another session being open from Firefox or Chrome simply not starting, the error might be because you have Firefox or Chrome open on another device and the new session is trying to use the same browser profile that the already open session is using.
Firefox
On Firefox you can fix this issue by either closing the other session on the other machine or using a different browser profile. Note that the new browser profile has default settings so you will have to set your preferences again.
When you log on to an Aalto computer or VDI and try to open firefox but get error message:

You should run:
$ firefox -P
This opens profile selection window:
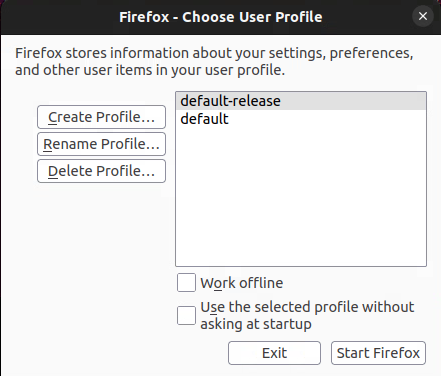
From this you choose "Create new profile" to create a new profile you can use to open firefox. Note that as long as you remember to properly quit the browser and log out of the machines you have been using this problem should not repeat.
Chrome
You try to start Chrome and see no error message in GUI and the app does not start, try to start it from command line and see if you get error:
$ google-chrome
...
The profile appears to be in use by another Google Chrome process (657915) on
another computer (berylli).
Chrome has locked the profile so that it doesn't get corrupted.
If you are sure no other processes are using this profile, you can unlock the
profile and relaunch Chrome.
...
Unable to show message box: Google Chrome - The profile appears to be in use by
another Google Chrome process (657915) on another computer (berylli).
Chrome has locked the profile so that it doesn't get corrupted.  If you are
sure no other processes are using this profile, you can unlock the profile and
relaunch Chrome.
The error message tells you what computer the session is open on. You should close the session on that machine. If you are sure no other session is open on another machine but you still get the same error message, it is most likely because the session was not closed properly before powering off a machine. In this case you can delete Chrome's lockfiles:
$ cd ~/.config/google-chrome
$ rm SingletonLock SingletonSocket SingletonCookie
If the problem persists, please contact servicedesk@aalto.fi.